So Many Choices - Where to Start? -
Hair braiding styles are coming back in fashion with a bang and are hitting weddings and special events in a very big way. Braids are trendy and are suitable for anyone - whether you have thin or thick hair. The braid can be a very romantic hair style too. You can choose a free flowing, lose style or a smooth and tight style.
How to tie a Windsor tie knot - Step by Step
A French or sweetheart braid may look perfect on your wedding day. Simple braiding is usually an inexpensive method for styling your hair on your wedding day, even though there are very elaborate braiding styles that may cost you a fair bit, depending on the time it takes your hair stylist to achieve the look you are after. That being said, someone in your family or bridal party may have the skills to braid your hair in the style you prefer, and they may do this for a very minimal charge, if not free, maybe as a wedding gift to you. An added bonus to having your hair braided for the big day is that after your reception, when you remove your braids, you will find that you then have a crown of beautiful waves for your post-wedding festivities or honeymoon flight.
Here are a few hair braiding style tutorials:
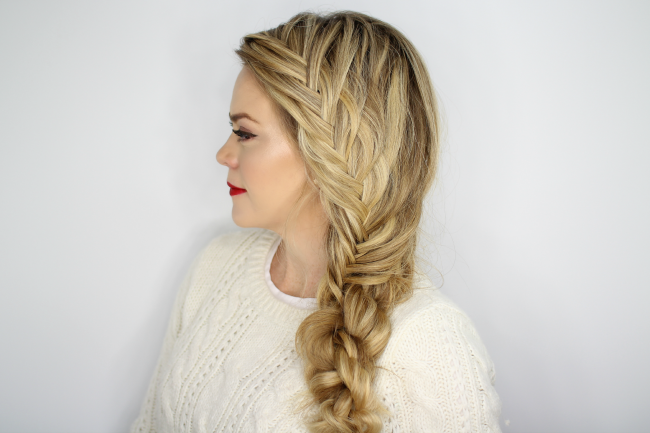
Messy Side Braid of Alexander Wang
Red carpet celebrities are a source of motivation for lots of girls because they constantly try to adopt celebrity hairstyles, makeup, and outfits. Your hairstyle is the most important detail of your wedding, next to your dress. A versatile braid is introduced on the red carpet by Alexander Wang. A big messy braid gives you a lose hanging and half-way down look. It is a versatile braid and easy to create on your wedding day. It only takes a few minutes to create, therefore I am going to share some simple steps to have messy side braid just like Alexander Wang:
Things You Will Need:
- Bobby Pins
- Heat Protectant
- Hair Brush
- Hair Elastic
- Hair Spray
- Rat Tail Comb
- 1” Curling Iron
Easy Steps to Follow:
- Push all the hair to one side, either left or right as per your choice, and then brush through it. If you have some bangs, leave them on the opposite side for the next step.
- Then section you hair in three, do a regular side braid and secure it with a hair elastic at the end.
- Now use your rat tail comb to flip out some hair on the other side and curl remaining hair using your curling iron. Do not forget to use a heat protectant before using a curling iron to make your hair heat resistant.
- You only require loose curls so create curls at the end of your hair while keeping curler away from your face. Curl all free hair (bangs) by taking small sections one by one after spraying them with a small amount of heat protectant.
- Your request is a messy side braid, so do it freely by selecting hair strands randomly and holding the curler for at least 7 to 8 seconds at one place. Spray your hair with hairspray and scrunch your hair with your hands to make your hair messier as per you taste.
- This is the perfect style for a summer wedding, for a date or for a party with your friends. It only takes a few minutes and gives you a sexy, sassy look.
Twist Braid
- Begin your hairdo with a thorough brushing of your hair because tangles can restrict ease of styling.
- After brushing, decide the thickness of the hair strand you want to create, then twist braid and clip the remaining hair aside for next steps.
- Backcomb your selected locks section to put some volume into it and then lightly comb it to smooth down the top layer; otherwise, it looks ratted.
- Take a thin section of a ¼ inch from your selected part and further split it into two halves.
- Coil the front half over the back half in a way that your back half will be front half now. Take one more section to repeat the same process like take a thin strand and add it to the front piece.
- Now you only have to repeat the same steps with remaining hair of selected strand to complete your twist braid i.e. twist the front stand over the back strand and add a new thin strand to the front strand and twist it over the back strand etc.
- You can make this braid to the level of your ear and then secure it with bobby pins while hiding the ends of the braid. You are ready for your look and for more glamor you can accessorize your braid with small colorful beads.
DIY Bridal Updo
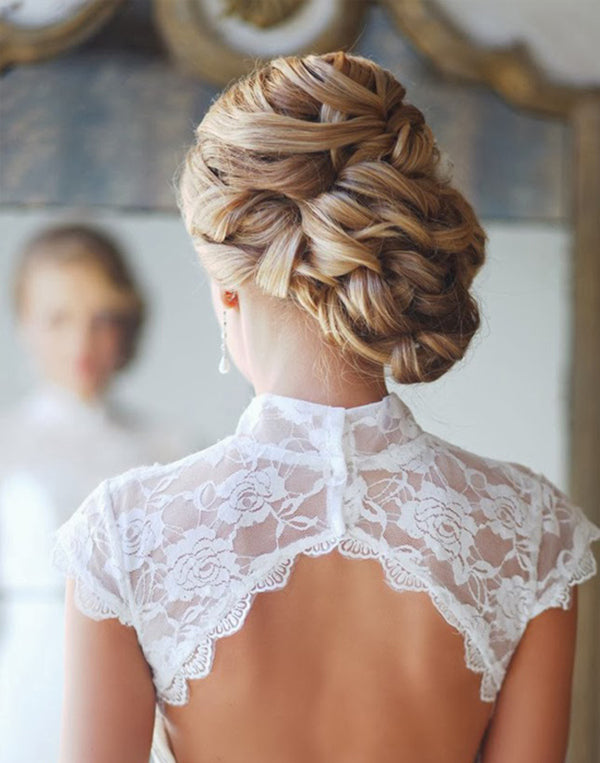
For your bridal look, if you want new hair braiding styles, you can try this bridal updo to get a stylish look:
- Take a 1 ½” curler to put some loose curls in your locks after sectioning them in small strands to get fine curls in all hair. You can also use a flat iron to put loose curls in your hair.
- If you find that your hair is thin, then backcomb them to add body and extra volume in the hair.
- Select heavy side of your hair and split them from your ear forward and lock them sideways for next styling steps. Create a low side ponytail with the rest of your hair but only flip half hair through the elastic to create a loop.
- Run your finger through your hair to scrunch up and part all curls to spread them around the loop. Fix all extra hair strands with bobby pins to create a messy bun.
- Grab the remaining hair and create a loose waterfall braid to let the hair hang freely.
- Swathe the ends of the braid across the top of the messy but and use bobby pins to lock it for the whole day. Finish your hairdo with the finishing touches of hairspray to get this hairstyle for a long period.
Knotted Messy Side Braid
Just like French braid, Dutch braid, side braid, this knotted messy braid is one of the stylish braiding hairstyles for brides. It can give a great look to your personality because versatile trends in braided hair can give a unique touch to the frame of your face. Knotted messy side braid is a new but cool addition in the braid family. It is easy to wear and take only 3 to 5 minutes depending on your expertise. You are only required learning the knot, and you will be able to wear this great stylish braid. Just follow the given below simple steps and this fabulous hairdo will be yours:
Things You Need:
Simple Steps to Follow:
- Brush your hair and bring them to the front to create a side braid. Take two long sections from the back of the hair one from the left side and the second from the right side and make a knot.
- Bring both two section back and cross them in the back and now bring them forward and add some hair strands from the front.
- Try to find longer hair strand from the back of the hair and do the same thing hair. Repeat this section to make as many knots as possible. The process is same exact like make a knot, cross it, add more hair from both sides one by one.
- In the end bring your hair in the back to tie a knot to secure your messy side braid and put your elastic to make sure it will stay for a long time.
- It is perfect everyday hairstyle and helps you to get rid of the same hairstyle again and again. You can wear it in office, school or any other casual as well as formal gatherings. There are lots of options for you to decorate this braid or let it simple. There are lots of small beads of different colors available in the market. It will look glamorous so must try it. You can also use colorful ribbon to tie at the end of the braid or some fancy hair clip. It is entirely up to you so be creative and has your hairstyle in a way you want.
Bohemian Side French Braid
Things You Need:
- Paddle Brush
- Hair clip
- Hair tie
- Bobby pins
Instructions of Follow:
- Blows dry your hair a day ago because it will add more texture to your hair. Brush through your hair to unravel them and side part your hair and its best way is to take it to the level of your corner of the eye about two inches of length.
- Now part your first layer with the level of two-inch parting thickness using a rat tail comb for perfection. Push away all back hair after having front parting so that these cannot restrict your styling.
- Take a hair strand from front part and then split it into three further sections to begin braiding. Take the front section, cross it above the middle then take the back section and cross it over the front. Do it as tight as possible and keep adding hair from the bottom layers.
- Keep adding hair from the bottom to get a beautiful shape but make sure to prepare tight braid. End your braid near your ear or you can make it longer as per you like. Bobby pins are the best way to secure your braids properly.
- Release the hair from the back, brush it and you can leave your hair as it is if you are fine with this look but if you want to add something more in your style, follow the below steps.
- Take off your hair back to do a braid, brush them and divide them into three sections and start braiding. You can make a loose braid, tight braid, side braid or back braid as per your choice. In the end, tie your hair with an elastic band to secure them.
- • To get a messy look, pull on the braid to give it more volume and fuller look. If you have baby or flyaway hair in the nape, then you can secure them with the bobby pins.
Side Dutch Braid
- It is simple to do a Dutch braid and requires only a few minutes, and finally, you get a perfect look for your school.
- Grab a section of hair from the crown of your head. If you have bangs, then it is your choice either you want to braid them or want to leave them on your face.
- Divide the section into three and start braiding under different regular braid that usually goes over. While braiding continues adding up hair in your braid like take one strand under and put in a tiny segment of hair then again go under and add another section from right.
- Complete your braid in the same process and after reaching to the little lower of your ear section combine all the hair and make further three thick sections.
- Now again braid under with the remaining hair to get more refine the look. After completing the braid tie it with hair elastic to secure it completely.
- Now grab the sections of your top braid to give it a fuller look.
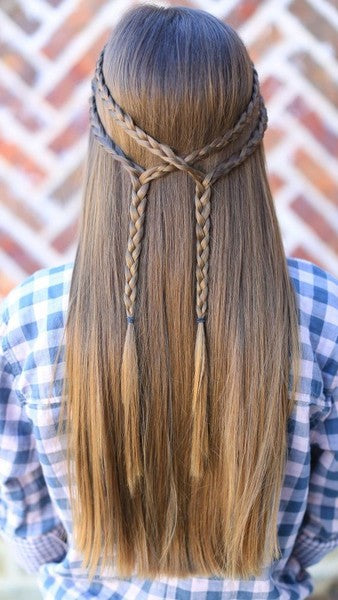
Sweetheart Braid
Sweetheart Braid is the perfect hairstyle for wedding and Valentine’s Day because girls with medium to long hair can equally enjoy this look. It is a perfect choice and takes only 10 to 15 minutes to complete based on your expertise. Your little efforts can give you excellent look for valentine and wedding day.
Simple Steps to Follow:
- Brush your hair properly to remove all tangles and make them silky smooth. Section off the ½ hair of your crown area and comb them appropriately.
- Split this section in further two sections to make two braids. Now create two regular braids of both two sections and tie them from the bottom with a plastic band to secure them properly.
- Circle each braid and fix in place to form the top of heart. Pin underneath of the plaits to make a position by folding ½ of the long hair ends. You can do it easy by twisting both braids to form a heart and then use bobby pins to secure them in their place.
- You can also create two braids of your entire hair to make a heart shape with the same process. Do not forget to use color ribbon or color beads to decorate your hairstyle.
- You can add some more twists in this hairdo by trying French braid or Dutch braid because this can give a perfect look to the frame of your face.
Do not forget to try it on this Valentine or a special date with your sweetheart and get cool and lovely comments. For your big day, this hairstyle can give a stylish touch to your personality. You can pair this hairdo with beads and silver flowers.
Do not forget to share your views with use because these are very precious for us. We cannot improve our work without your respectful contribution.


